“Migration of legacy data warehouse to cloud-native centralized architecture”
Problem statement:
One of our business partners wanted to harness the power of modern-day problem-solving using the latest technology. So, they wanted their data to be present on the cloud, As cloud computing becomes the new base to enable distributed computation and analysis. To perform computation on the system, we needed to migrate their legacy data warehouse to cloud-native centralized architecture.
Solution:
By Keeping in mind, the requirements and other decision factors We suggested to use azure Database Migration service to migrate the database in SQL Server to Azure SQL managed instance with minimal downtime, database health checks and options to have selective database portability.
Steps followed during the process-
- Registered the Azure data migration service.
- Created an instance of database migration service.
- Created and deployed a project in database migration service.
- Run and monitored the migration process.
Pre-requisites to perform the migrations include that proper security protocols are laid out, windows firewall is managed along with proper maintenance of SQL server with password. Each user part of migration process has the required roles and knowledge about the job at hand. Read/Write privileges are added to each service role being used during the migration process.
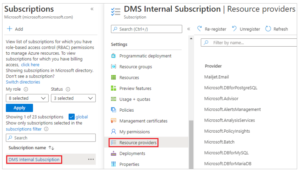
Registration of Azure data migration service –
We needed to register the Microsoft Data Migration resource provider before we create an instance of database migration service. The registration process includes selecting the subscription in which we can create an instance of azure database migration service and registering database migration service into resource provider.

Creation of Azure Database Migration Service instance –
We need to create a resource of migration service and to create migration service basic screen we performed following steps –
- Select a subscription.
- Create a new resource group or choose an existing one.
- Specify a name for the instance of the Azure Database Migration Service.
- Select the location in which you want to create the instance of Azure Database Migration Service.
- Choose Azure as the service mode.
- Select a pricing tier.
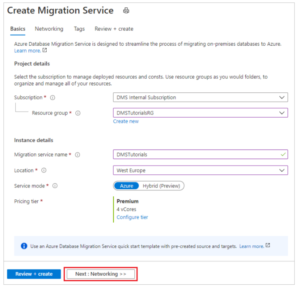
Next step includes setting up Network screen –
- Select an existing virtual network or create a new one. The virtual network provides Azure Database Migration Service with access to the source server and the target instance. For more information about how to create a virtual network in the Azure portal
- Select Review + Createto review the details and then select Create to create the service.
After a few moments, your instance of the Azure Database Migration service is created

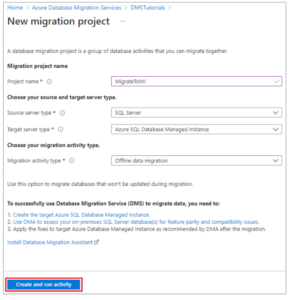
Create a Migration Project –
- In the Azure portal menu, select All services. Search for and select Azure Database Migration Services.
- On the Azure Database Migration Services screen, select the Azure Database Migration Service instance that you created.
- Select New Migration Project.
- On the New migration project screen, specify a name for the project, in the Source server type text box, select SQL Server, in the Target server type text box, select Azure SQL Database Managed Instance, and then for Choose type of activity, select Offline data migration.
- Select Create and run activity to create the project and run the migration activity.
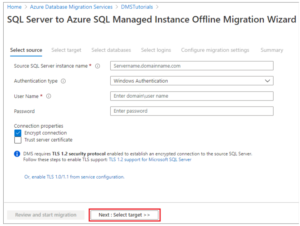
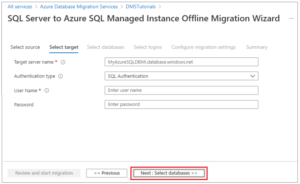
- Specify Source and Target details.
- Provide additional parameters and start the process.
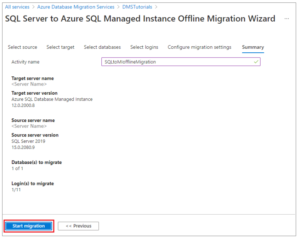
Run and monitor the migration process –
- On the Summary screen, in the Activity name text box, specify a name for the migration activity.
- Review and verify the details associated with the migration project.
- Start Migration.
Result:
The above-mentioned steps enable the user to solve the problem of migrating the local SQL server data on to the cloud platform. By performing the migration, we enabled our data to much bigger usage and perform computation and analysis. This data once uploaded to cloud can be accessed from any geographical location and perform machine learning and deep learning analysis.